INTERACT FORUM

Please login or register.

Login with username, password and session length
Advanced search  
Pages: 1 [2]   Go Down

Author Topic: Standard View Skinning Tutorial  (Read 65874 times)

Dirhael

  • World Citizen
  • ***
  • Posts: 177
Re: Standard View Skinning Tutorial
« Reply #50 on: August 13, 2015, 05:24:32 pm »

You can specify an image that's bigger than needed for 100% (which is good because of high DPI and scaling).

So you make the image four times as big and say that the scale is 4.

Just wanted to add that the Scale parameter is actually more flexible than it first appears. You can target each scaling percentage individually if you need to. For instance, one of the images I used in my skin didn't look quite right at 150%, but was OK on most of the others. The solution was to use <Entry Scale="1.5" ...> and create a separate image for just this scaling factor.
Logged
:: My J​RMC history :: 13>14>15> 16>17>18>19>20>21>23>24>25>26>27>28>29>30>31

marko

  • MC Beta Team
  • Citizen of the Universe
  • *****
  • Posts: 8931
Re: Standard View Skinning Tutorial
« Reply #51 on: August 19, 2015, 01:02:30 am »

I think I need this for the frame border, but cannot get it to work. Could you show me how you are adding specific scaling images in the xml?

The issue I am having is, that with a scale of four, and 20 pixel frame border images, MC is leaving a 15 pixel internal border, filled with the "Face3D" colour (magenta for emphasis below) when used at 100%. The border gets smaller as the scale goes up, until disappearing at 400%, displaying as intended.

Dirhael

  • World Citizen
  • ***
  • Posts: 177
Re: Standard View Skinning Tutorial
« Reply #52 on: August 19, 2015, 02:14:46 pm »

I think I need this for the frame border, but cannot get it to work. Could you show me how you are adding specific scaling images in the xml?

The issue I am having is, that with a scale of four, and 20 pixel frame border images, MC is leaving a 15 pixel internal border, filled with the "Face3D" colour (magenta for emphasis below) when used at 100%. The border gets smaller as the scale goes up, until disappearing at 400%, displaying as intended.


I'll try, although I don't know if it'll solve that issue or not.

Here's a snipped portion of my skin's main.xml:
Code: [Select]
       <EntryGroup Name="VolumeSliderFront">
            <Entry Bitmap="PlayerBar_SliderVolFront.png" />
            <Entry Scale="1.5" Bitmap="PlayerBar_SliderVolFront-1,5x.png" />
            <Entry Scale="2" Bitmap="PlayerBar_SliderVolFront-2x.png" />
        </EntryGroup>

Here you can see that I'm using Scale="1.5" and Scale="2" (the former in this case meaning "use this image for 150% for everything above 100%, up to 150%" and the latter "use this image for anything above that"), and each of those entries have their own unique image file. If you needed a unique image or setting such as margins etc. for, let's say 175% then you'd add an entry with Scale="1.75" (in my example, this would then be used for 175%-199%).

Hope this helps you out :)

Edit: Short summary, for a skin element using Scale 1, 1.5, 1.75 & 2:
Scale="1"     :   0 - 100%
Scale="1.5"  : 101 - 150%
Scale="1.75" : 151- 175%
Scale="2"     : 176 - 400%
Logged
:: My J​RMC history :: 13>14>15> 16>17>18>19>20>21>23>24>25>26>27>28>29>30>31

marko

  • MC Beta Team
  • Citizen of the Universe
  • *****
  • Posts: 8931
Re: Standard View Skinning Tutorial
« Reply #53 on: August 20, 2015, 01:23:33 am »

Dirhael,

"<EntryGroup >" completely passed me by. This fixes my issue.

I would need one for every scaling level for it to be perfect, but with 1x, 2x, 3x and 4x, the 'inbetweens' are barely noticeable, and I think I can live with that.

I had all but given up on fixing this one, thank you very much for replying.

-marko

Dirhael

  • World Citizen
  • ***
  • Posts: 177
Re: Standard View Skinning Tutorial
« Reply #54 on: August 20, 2015, 10:45:11 am »

Dirhael,

"<EntryGroup >" completely passed me by. This fixes my issue.

I would need one for every scaling level for it to be perfect, but with 1x, 2x, 3x and 4x, the 'inbetweens' are barely noticeable, and I think I can live with that.

I had all but given up on fixing this one, thank you very much for replying.

-marko

Good to hear you solved it :) It can certainly be difficult to figure out just what causes a particular issue with the skinning engine, as there are some bugs and quite a few inconsistencies in what works where. In a "perfect world", the skinning engine would use CSS/SASS for styling. It would have some drawback as well, but it would have made things easier I think...
Logged
:: My J​RMC history :: 13>14>15> 16>17>18>19>20>21>23>24>25>26>27>28>29>30>31

marko

  • MC Beta Team
  • Citizen of the Universe
  • *****
  • Posts: 8931
Re: Standard View Skinning Tutorial
« Reply #55 on: December 16, 2015, 01:12:31 am »

Skinning The 'experimental' tag window

The 'how do you do that?' question has been asked in various threads, so I figured an answer here might be appropriate. Bear in mind that things might change in the future, but for now, it's quite simple to do, mostly because we don't have much to customise.

To apply skinning to the experimental tag window you just need three images and some xml for the skin file.

Images
1. Group image (with expanded/collapsed image)


2. Field label image


3. Field image


required xml
The skinning engine needs to know what to do with your images, so you need to add a "TAGWINDOW" block to the skin's 'main.xml' file. In Black and Blue Too, it looks like so:
Code: [Select]
<TAGWINDOW>
  <Entry Name="Group" Bitmap="TagWindow_Group.png" NumberImages="2" Columns="20,?-Flex,10" Rows="1,?-Flex,1" Cells="B1-HTILE,B2-HTile,B3-HTILE" />
  <Entry Name="Field" Bitmap="TagWindow_Field.png" Scale="4" NumberImages="2" Rows="4,?-Flex,4" />
  <Entry Name="FieldLabel" Bitmap="TagWindow_FieldLabel.png" Scale="4" NumberImages="1" Columns="?-Flex" Rows="?-Flex" Cells="A1-Tile" />
</TAGWINDOW>

The text colour is derived from the value entered in the <FRAME> block, but be careful here as that value is used in other areas too, such as tooltip borders and text, so a balance needs to be found. Hopefully we can get exclusive values for the tag window in the near future.

Put all that together, and here's how it looks in action (pardon the pun ;)):


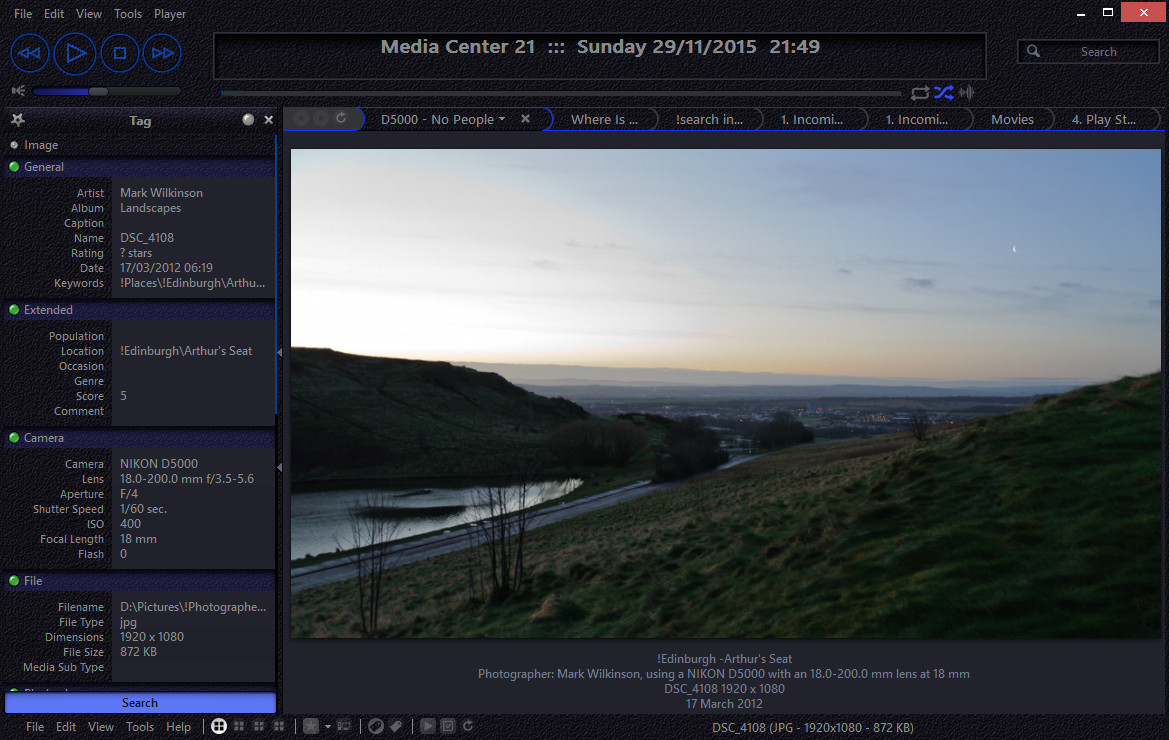
The example is called Black and Blue Too, which can be found here if you would like to try it.
The experimental tag window has a blue-ish mouse over shade as you move the mouse between fields in the tag window. This colour is currently hard coded into MC and we have no control over it. This may change though. Luckily for me, it works quite well in this skin.

So there you have it, quick and simple experimental tag windoow skinning.
Enjoy.

-marko

kurushi

  • Citizen of the Universe
  • *****
  • Posts: 683
Re: Standard View Skinning Tutorial
« Reply #56 on: December 16, 2015, 05:35:37 am »

Marko this skin is really beautiffull a clean evolution of you're old blue one!
Logged

marko

  • MC Beta Team
  • Citizen of the Universe
  • *****
  • Posts: 8931
Re: Standard View Skinning Tutorial
« Reply #57 on: December 16, 2015, 05:58:02 am »

Trust me, the picture shows the experimental tag window, skinned. Try it. Save the three images in your skin folder, copy/paste the code into your main.xml file, save it, reload your skin, open new tag window. It won't look right in your skin, especially if you don't have scaling enabled, but should be enough to get you started.

kurushi

  • Citizen of the Universe
  • *****
  • Posts: 683
Re: Standard View Skinning Tutorial
« Reply #58 on: December 16, 2015, 06:02:23 am »

Yep my bad it's really the new one :p
so thank you for the tutorial!

Just one thing on you're blue skin, the playerbar progreession is not in the same blue than button and it 'll better with the same colour or if you really want another color you can try it grey or black.
Logged

marko

  • MC Beta Team
  • Citizen of the Universe
  • *****
  • Posts: 8931
Re: Standard View Skinning Tutorial
« Reply #59 on: December 16, 2015, 06:19:00 am »

:)
Thank you. It was the same as the rest of the blue, but I felt that it got kind of lost amongst all the other blue lines around it, so changed the shade... I might try a different colour, we'll see.

Remember to watch out for that frame text colour when you skin yours, it's more restrictive than you might think at first...

kurushi

  • Citizen of the Universe
  • *****
  • Posts: 683
Re: Standard View Skinning Tutorial
« Reply #60 on: December 16, 2015, 09:19:01 am »

Yep but i have just retouched one skin with the frame  text color because others are fine in black cause i use different backgrounds for the tag window...

I have tried to add some lines about coulours of the texts in the tag window but it doesn't work :(

Anyway since the baground can be colored it's not really a big issue...
Logged

Awesome Donkey

  • Administrator
  • Citizen of the Universe
  • *****
  • Posts: 7349
  • The color of Spring...
Re: Standard View Skinning Tutorial
« Reply #61 on: March 24, 2017, 02:54:13 pm »

Marko, thanks for the above tutorial, it helped out greatly when updating the other bundled skins to support the experimental/new tag window.

The text colour is derived from the value entered in the <FRAME> block, but be careful here as that value is used in other areas too, such as tooltip borders and text, so a balance needs to be found.

Yeah, this is a total PITA. It has been very hard to find an acceptable balance for the two remaining skins without experimental/new tag window support (Blue Steel and Thunderstorm). I've got the assets and everything else ready to go, the only hangup is the font.

Hopefully we can get exclusive values for the tag window in the near future.

This, please. X100 on this one. It's probably going to be required to update those two remaining skins, sadly (since changing the <FRAME> block would likely not look good and would require changing good bits of the skin).
Logged
I don't work for JRiver... I help keep the forums safe from Viagra and other sources of sketchy pharmaceuticals.

Windows 11 2023 Update (23H2) 64-bit + Ubuntu 23.10 Mantic Minotaur 64-bit | Windows 11 2023 Update (23H2) 64-bit (Intel N305 Fanless NUC 16GB RAM/256GB NVMe SSD)
JRiver Media Center 32 (Windows + Linux) | Topping D50s DAC

Matt

  • Administrator
  • Citizen of the Universe
  • *****
  • Posts: 41900
  • Shoes gone again!
Re: Standard View Skinning Tutorial
« Reply #62 on: March 27, 2017, 08:38:14 am »

Coming next build:
Changed: The new tag window supports using a custom text color (add it to <TAGWINDOW> <Colors Text="FF00FF" />).
Logged
Matt Ashland, JRiver Media Center

Awesome Donkey

  • Administrator
  • Citizen of the Universe
  • *****
  • Posts: 7349
  • The color of Spring...
Re: Standard View Skinning Tutorial
« Reply #63 on: March 27, 2017, 08:56:07 am »

Coming next build:
Changed: The new tag window supports using a custom text color (add it to <TAGWINDOW> <Colors Text="FF00FF" />).

Groovy, thanks Matt! I'll be able to finish the last two skins. :D
Logged
I don't work for JRiver... I help keep the forums safe from Viagra and other sources of sketchy pharmaceuticals.

Windows 11 2023 Update (23H2) 64-bit + Ubuntu 23.10 Mantic Minotaur 64-bit | Windows 11 2023 Update (23H2) 64-bit (Intel N305 Fanless NUC 16GB RAM/256GB NVMe SSD)
JRiver Media Center 32 (Windows + Linux) | Topping D50s DAC

Awesome Donkey

  • Administrator
  • Citizen of the Universe
  • *****
  • Posts: 7349
  • The color of Spring...
Re: Standard View Skinning Tutorial
« Reply #64 on: May 12, 2017, 06:59:01 am »

Matt, can you add HilightText support to <LIST>, e.g. <Colors HilightText="FFFFFF">? I need this to complete a custom skin I've been working on (otherwise it looks wrong as it defaults to using Text when hovering my mouse over things in the list - I've done it for Options and the Tree, but can't with List or the new tag window).
Logged
I don't work for JRiver... I help keep the forums safe from Viagra and other sources of sketchy pharmaceuticals.

Windows 11 2023 Update (23H2) 64-bit + Ubuntu 23.10 Mantic Minotaur 64-bit | Windows 11 2023 Update (23H2) 64-bit (Intel N305 Fanless NUC 16GB RAM/256GB NVMe SSD)
JRiver Media Center 32 (Windows + Linux) | Topping D50s DAC

marko

  • MC Beta Team
  • Citizen of the Universe
  • *****
  • Posts: 8931
Re: Standard View Skinning Tutorial
« Reply #65 on: September 07, 2017, 01:44:39 am »

Coming next build:
Changed: The new tag window supports using a custom text color (add it to <TAGWINDOW> <Colors Text="FF00FF" />).
Also available now are: <Colors Text="FF00FF" Group="FF00FF" Selection="FF0000" />

Although, those particular colours are not really recommended ;)

Sangie

  • Recent member
  • *
  • Posts: 43
Re: Standard View Skinning Tutorial
« Reply #66 on: August 30, 2023, 10:08:55 am »

How do you put an image in the background of the tree view and list/thumbnail view? I only see that colors can be used but there must be a way.

Like how I did here for MediaMonkey

https://i.imgur.com/Qgl7s.jpg
Logged

marko

  • MC Beta Team
  • Citizen of the Universe
  • *****
  • Posts: 8931
Re: Standard View Skinning Tutorial
« Reply #67 on: August 30, 2023, 12:28:08 pm »

You can use an image for the tree, but not the file list.

To see how it's done, look at the main.xml file for a skin that uses a tree image, such as Black and Blue Too

-marko

BlackPlatypus

  • Recent member
  • *
  • Posts: 5
Re: Standard View Skinning Tutorial
« Reply #68 on: November 28, 2023, 11:29:08 pm »

Since this is the official skinning tutorial thread...
Could we have an update on the Wiki, please? 😅
It's still referencing things around v19/2015.
Especially, an update for the "SDK" (?) page would be nice. There are new elements (entry), new attributes, and probably other new concepts.

A concrete question: I haven't managed to find the entry for the waveform bar 🤔
Beyond setting colors in PLAYERBAR > Entry > Colors WaveformBarA and WaveformBarB, is there a way we can reposition the waveform bar with an offset, resize it, etc?

Cheers!
Logged

EnglishTiger

  • MC Beta Team
  • Citizen of the Universe
  • *****
  • Posts: 952
Re: Standard View Skinning Tutorial
« Reply #69 on: November 30, 2023, 10:04:43 am »

The waveform bar is simply an alternative display option that occupies the same location as the progress bar and there is no way to reposition or resize it, or the progress bar.
Logged
Win NUC - VENOEN 11Th NUC Mini PC Core i7 1165G7,Dual HDMI 2.0+Mini DP,Windows 11 Mini Desktop Computer,Thunderbolt 4.0,1 Lan, USB-C,Wifi,Bluetooth 5.0,32GB RAM Toshiba MQ04ABF100 ‎500Gb 5400 RPM ‎eSATA HD, Gigabyte GP-GSM2NE3512GNTD 1Tb NVMe SSD, Samsung 870 QVO 8 TB SATA 2.5 Inch SSD (MZ-77Q8T0) in Sabrent Ultra Slim USB 3.0 to 2.5-Inch SATA External Aluminium Hard Drive Enclosure (EC-UK30)

Apple 2020 Mac mini M1 Chip (8GB RAM, 512GB SSD)
Sabrent Thunderbolt 3 to Dual NVMe M.2 SSD Tool-Free Enclosure with Sabrent 2TB Rocket NVMe PCIe M.2 2280 High Performance SSD + Crucial P3 Plus 4TB M.2 PCIe

ET Skins & TrackInfo Plugins - https://englishtiger.uk/index.html

BlackPlatypus

  • Recent member
  • *
  • Posts: 5
Re: Standard View Skinning Tutorial
« Reply #70 on: December 01, 2023, 03:22:25 am »

The waveform bar is simply an alternative display option that occupies the same location as the progress bar
Oh, duh! Of course
I'm sorry, I completely blanked there!
There is no way to reposition or resize it
Aw :(
I guess I'll try a feature request then (or adding my +1 to one, if it already exists)

Thank you!
Logged
Pages: 1 [2]   Go Up